photo header_abhaya_zps721a0d73.png

 photo nav_home_zpsfd56deeb.png photo nav_about_zps4d2fbda0.png photo nav_contact_zpsd0708482.png photo nav_partner_zps9b152967.png

Showing posts with label DIY. Show all posts

5.30.2013

DIY >> Cut Out Geo Dress


Guess what?! I'm in Minnesota for a few days soaking up some good friends and family time! But don't fret, pets, as I've prepared some pretty sweet posts for my absence. However, please don't be offended if I'm even slower than normal to reply to any comments or emails. :) On to the DIY!

I saw this really cute tank at Urban Outfitters recently that had these triangle cutouts all around the middle, but I didn't buy it. Then, out of nowhere the other day, I thought, hey, I could do that! So I did. Well, a variation anyway. I've seen some cute tutorials for different t-shirt makeovers, so I thought I'd combine the two ideas. Here's the before and after >>
Fun, right? I used a t-shirt dress that I've had forever, but a regular tee would be great, too.

Besides a shirt, you'll need >>
- A piece of flat cardboard, sharp scissors, a cardboard cutout of desired shape, a marker or piece of chalk.

Here's how I got this look:
// Turn the shirt inside out, and lay it as flat and smooth as possible. Cut the sleeves off just inside the shoulder seam, following the line of the seam.

// Cut out the neckline. I used a big bowl to help me get it as even as possible, and used a marker to make a light line. You might want to use another shirt that you like the neckline of to use as a guide for how low you want to go.

// Place the flat piece of cardboard inside the shirt to make a flat surface. Using your cardboard shape, trace the pattern out that you want. Since the shirt is inside out, I just used a regular old fine Sharpie and pressed lightly. If you were fancy and had some dressmakers chalk around, that would be even better.

// After drawing out what you want, snip a hole in the middle of each negative space to make it easier to cut out. Then, carefully cut each shape. They don't have to be perfect since the edges will roll a bit, but the cleaner your lines the better it will look. Keep the cardboard in the shirt for the cutting out part, as it will ensure you don't accidentally cut through two layers (I've done it).

// Turn it right side out and rock your new frock out!

I'm a seriously un-crafty lass, so if I can do this, anyone can. Let me know if you try it out!

shanti >> sondra

Get updates via // BLOGLOVIN' > FACEBOOK > TWITTER

4.26.2013

Ideas for >> Planting Herbs

We've had a few gorgeous days this week (although I think we're back to rain for the weekend), and I was able to get outside and get a few herbs planted! We have almost no outdoor space at our current place, just a few front steps outside of our door. Nonetheless, I wanted to maximize the space we do have and get some green things outside.
I had found this pallet a couple of months ago while taking the dog on a walk, and I dragged it home with the idea of another project in mind. Instead though, I thought it would make a great shelf for a few small pots to use up some vertical space. For now I have mint, dill, and thyme going, and I'd like to add a few more now that I know I have space for them.
I used a tea tin with a few holes punched in the bottom for a free, easy container.

When we lived in California, one of my favorite things was being able to have herbs growing outside year-round. We can't have plants outside year-round here in Seattle, but since these are in small containers they'll be easy enough to bring inside and place on a sunny windowsill (well, what passes in a Seattle winter).  It's so nice to be able to grab a sprig or two of what you need when you need it, rather than spend $3-$4 for a little plastic box of way more than you likely need at the store!

A few other ideas for planting herbs >

> Take this same pallet and turn it into it's own planter!
> Another idea for a vertical garden. Also, a great inspiration for re-using cans as planters.
> Start your own herbs from cuttings from friends.

I hope this inspires you to get your green thumb out!

shanti >> sondra

Get updates via: RSS > BLOGLOVIN' > FACEBOOK 


1.21.2013

Tea for Two >> Two for Tea

It's no secret that I love tea. I drink many cuppas-a-day from October until April. The act of drinking a hot mug of tea is so soothing, so ritualistic. That's why I was so excited to make this blend of tea, and package it into tea bags to give as gifts this past Christmas. I came across the blend on michelle's blog, and made up a big batch one December afternoon. You'll need >

> 6 heaping tablespoons dried peppermint (digestion, stomach issues)
> 3 heaping tablespoons fennel seeds (fever reducer, anti-microbial, digestion)
> 2 heaping tablespoons dried basil (immunity, digestion)
> 1 heaping tablespoon licorice root (immunity, digestion)

I was able to find all of the herbs at a local herbal apothecary, and I was surprised at how inexpensive they were. For about the cost of one box of 20 tea sachets, I was able to make almost 3 times as many.

To make the tea bags, I used unbleached coffee filters with the sides cut off >
Staple the top closed; you can add a string here if you like, and even a tag at the end. For the tea I gifted, I added baker's twine for strings and filled mason jars with sachets. I then tied a ribbon around the top of the jar, and added a tag with the ingredients and their benefits. Voila!

I have making these little coffee filter tea bags ever since, for all of my loose leaf teas. I hate tea balls and the like, I always have the worst luck with them and end up with a bunch of leaves in my mouth somehow. Let me know if you have any questions about any of the steps!

shanti >> sondra

p.s. The winner of the GaiamTV giveaway is Richelle from INDIGOBEANcreations! Congratulations! You'll be getting an email soon!

Get updates via: RSS * BLOGLOVIN' * FACEBOOK * TWITTER


12.14.2012

So Fresh >> And so Clean, Clean

Ever since we got Piko, the world's greatest beagle (imho), I have been learning a lot about dogs. I have always wanted a dog, but never had one growing up. And now that I have one, I love her to pieces and only want what's best for her. I have been looking carefully at the food and treats she gets, and making sure that we're not giving her anything that's not good for her. I'm choosy about what I put in MY body because I want to live a long and healthy life; why would the logic for a dog be any different?

I wanted something to freshen up her coat between baths, since she gets wet so often here in Seattle. Nobody likes the smell of wet dog. I learned it's not good to bathe your dog too often, and I thought I had seen something called waterless shampoo for dogs at the store. When I looked at the ingredients though, I saw a long list of chemicals. I mean, I know she'll eat garbage and sniffs poop, but I still don't want her licking chemicals off her fur or absorbing them through her skin. I went home and brewed up my own batch instead.
In a spray bottle I combined >>

1 c of water
2 tbsp white vinegar
2 tbsp baking soda
a few drops of essential oil

The vinegar and baking soda will fizz for a few minutes, but will die down quickly. Then, shake everything together and you're done! If your dog does not like spray bottles, you could always use this mixture to wet a washcloth and wipe him/her down. Piko smells so fresh and clean for about 2 days after I use this on her. And I don't have to worry about her licking it off (although, be sure that the essential oil you choose is safe for pets).  Since we're all in gift giving mode, a batch of this in a fancy spray bottle (or even a not fancy one!) would be cute for a dog lover.

shanti >> sondra

Get updates via: RSS * BLOGLOVIN' * FACEBOOK * TWITTER


8.24.2012

DIY >> Succulent Planters


I have a confession to make. I am no good at DIYs. That is, unless they are really, truly, almost childishly, simple. I do not own special tools, I am not very patient, and I am unfailingly cheap. So when I actually find, complete, and love something that I have done myself, I just about feel like I have won the lottery. This is one such project.

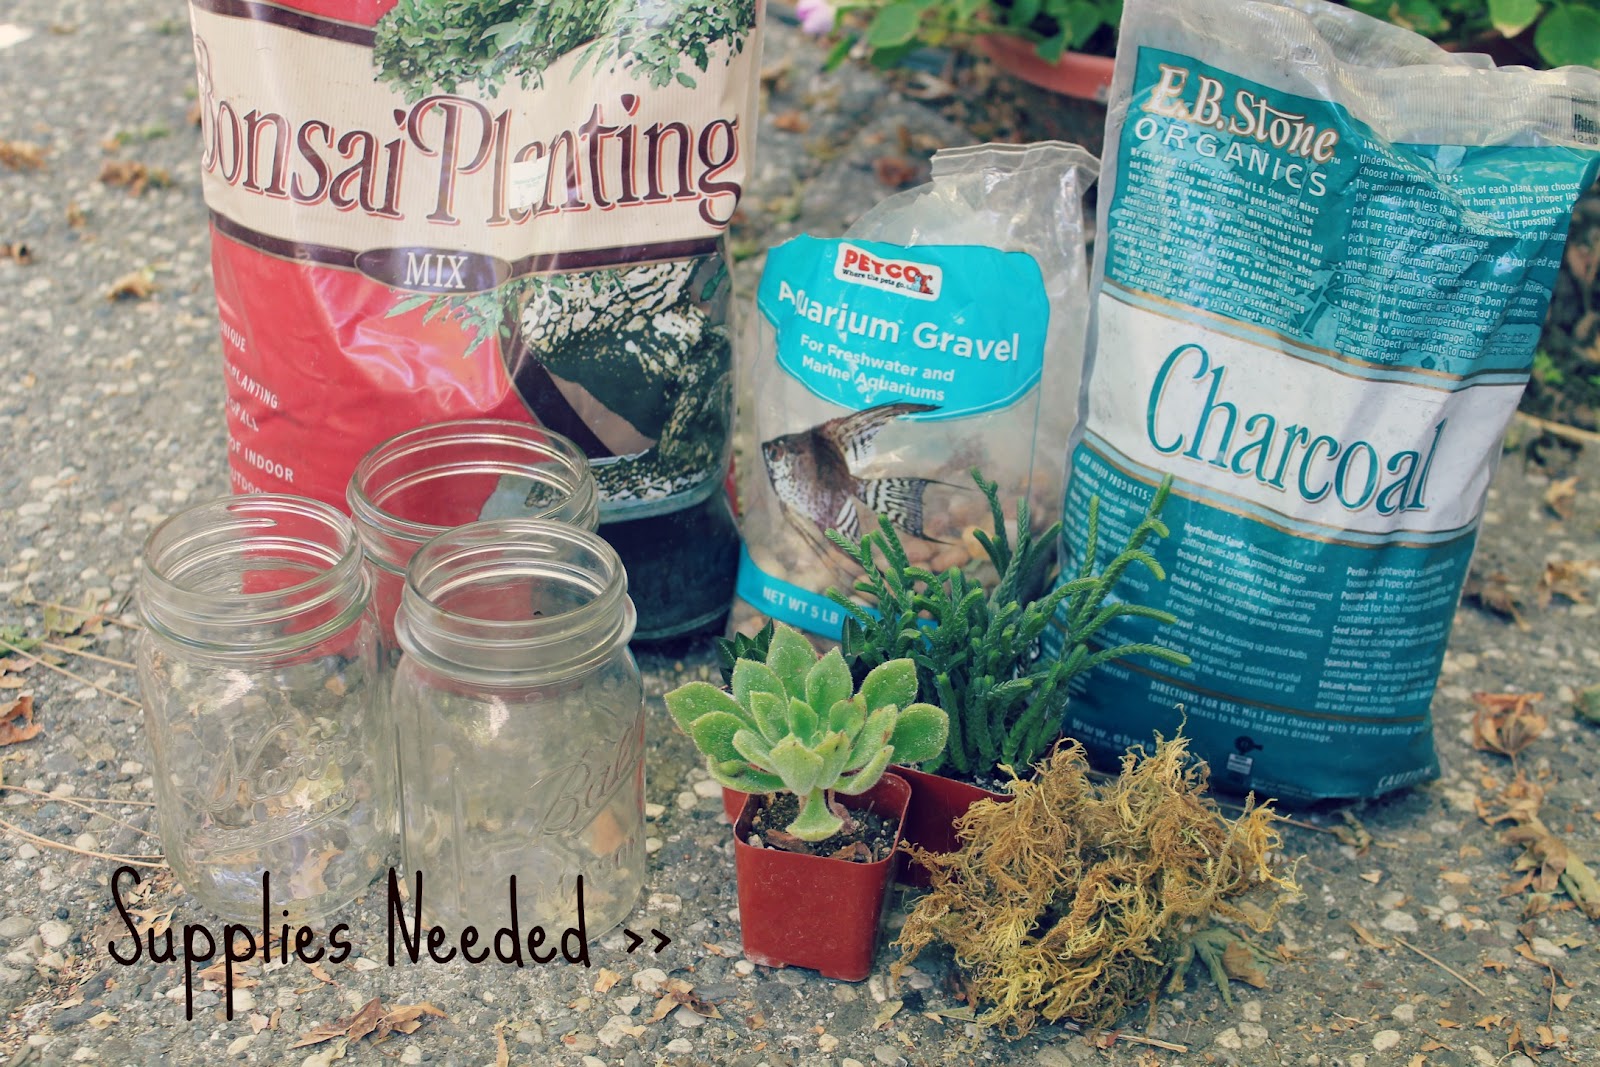
Here's what you need  >> 


> Aquarium gravel in any color you like

> Bonsai planting mix (this is what the guy at the nursery recommended, because it it is made for containers that do not drain)

> A bag of charcoal (also found at the nursery. This will help absorb any trapped moisture and smells.)

> Succulents that will fit your container

> Glass containers. I used a few mason jars, because if Pinterest has taught me anything, it's that everything is cuter in a mason jar.

> Moss for decoration (optional)

Here's what you do >>


> Pour a layer of gravel in the bottom of your glass for draining and keeping the roots out of any water that accumulates.
> Next, add a layer of charcoal.
> Add the plant, break up the roots a bit, and fill in with the bonsai mix. You may need to use a spoon to help fill and get the dirt down into all the crevices. A chopstick might also be useful.
> Repeat for each container, give 'em a little water, and you're done! I covered the tops of the soil with either more rocks, or some moss from the garden store. Super easy. Oh, and you do NOT have to have a green thumb to be maintain these successfully. I give you - exhibit A:
This is a larger grouping that I planted earlier this summer in a thrifted bowl. It has grown like CRAZY since I planted it! Plus, after awhile it got this green moss/algae looking stuff growing along the sides of the bowl which I think makes it extra pretty. Just give it a little water every few days, and leave in a semi-sunny spot. I usually add more water when I can't see any in the rocks at the bottom. If you forget to water it for awhile (like I do often), no biggie. It's good for them to dry out once in awhile. You can also add rocks, driftwood, or little ceramic figurines for extra interest.

All of the supplies for this project probably cost less around $20 total, including the plants and containers. And I still have plenty left to do a few more (read: SUPER CHEAP GIFT IDEA!).

Let me know if you try making these!

shanti >> sondra

Get updates via: RSS * BLOGLOVIN' * FACEBOOK * TWITTER