photo header_abhaya_zps721a0d73.png

 photo nav_home_zpsfd56deeb.png photo nav_about_zps4d2fbda0.png photo nav_contact_zpsd0708482.png photo nav_partner_zps9b152967.png

Showing posts with label recipe. Show all posts

2.04.2014

Frijoles Con Todo

Hiya, friends. I've had a few posts lined up, but we've had a bit of a roller-coaster couple of weeks around here, which has resulted in some news that I'm not quite ready to post on the internet yet (tantalizing, right?!). I'll share the deets as soon as I'm able, but in the meantime, now that things have settled down a bit, I'm here to share a tasty somethin' somethin' I whipped up recently.

BEHOLD.

BEANS.
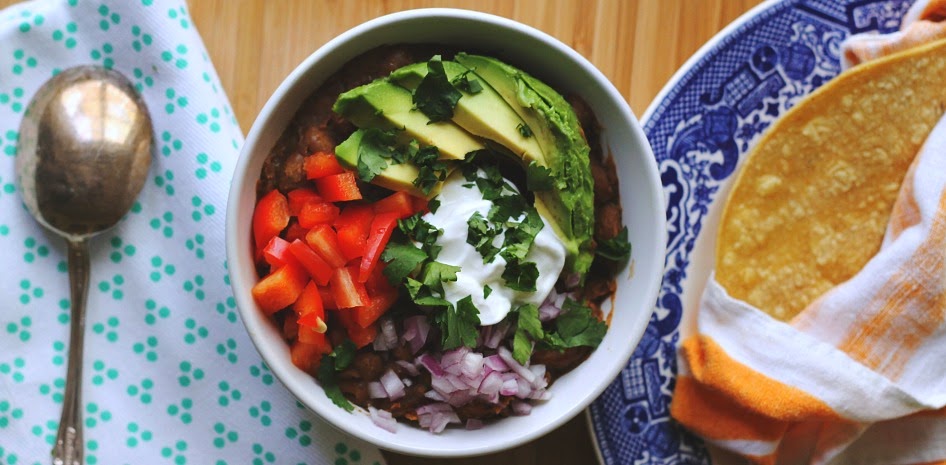
When we lived in Berkeley, one of our very favorite places to eat was Tacubaya, which was essentially a fancied-up taqueria with delicious Mexican food of all kinds. The frijoles con todo ("beans with everything" for those who don't hablo espanol) were something that I often mused that I should try to make myself sometime, but somehow never managed to think of it at, y'know, a meal-time decision making moment (a.k.a. the ever-constant "what's for dinner?"), until recently. The thought of these beans popped up seemingly randomly, over 2 years since we lived in Berkeley and on a grey, Seattle afternoon. Aren't thoughts weird?

I digress.

BEANS. The staff of life. So much of the world lives on beans as a staple food, or a variation thereof. This makes basically just a big, tasty pot of flavorful beans, and then you can add whatever you like on top. Plus, it's stupid easy. Here's what you'll need:

FROJOLES CON TODO (adapted from here)

BEANS

2 cups dry pinto beans
4-6 c. veggie or chicken stock
3-5 garlic cloves
½  white onion
1 jalapeño
2 bay leaves
1 tbsp Mexican oregano
1 tbsp cumin powder
1 tsp ground coriander
1 tsp chipotle chile powder
S+P to taste

TOPPINGS (suggestions)

diced red or green onion
sour cream
sliced avocado
crumbled cotija or feta cheese
bite sized pieces of Oaxaca cheese
halved grape tomatoes
diced peppers (red/green = milder), serrano/jalapeño = hotter)
minced fresh cilantro
poached egg

...and here's how to do:

Rinse and pick over your beans. I have never found a rock or weird thing in my dried beans, but it always says to do that, so I do, because the one time I skip it is the time there's some kid's stray Lego or something in them. Add the picked over beans to a large pot with the stock, and heat to just boiling. Knock back the heat so that the beans are just at a low simmer. Take a few garlic cloves, peel and smash them, and throw them in whole. Peel and cut the root end off of your onion, and drop it in. Slice the stem off of the jalapeño, and drop her into the pool with the rest of the kids.  Add all the spices and THAT'S IT. Pretty much, anyway. You just want to give it a stir once and awhile, and keep an eye on the moisture level. When it gets low, add a bit more stock or some water. They'll take about 2 hours total, so when they start to be about 80% of the way done and they begin to thicken, you'll need to keep a sharper eye on them. You want just enough liquid in there for them to cook all the way, but you don't want to be left with too much when they're done. At about 80% doneness, I'd keep the liquid level no more than 1/2" inch over the beans, and add liquid more frequently if need be. Once everything is tender, adjust the seasonings--including salt, especially if you used more water than stock to cook.

Spoon it up, and top it off as you like!

TIPS

// You can choose to leave the onion, garlic, and jalapeño in that you added at the beginning, or pull them out at the end. I found that they pretty much disintegrated into the beans, and the bites that had a bit extra of one of these were extra tasty.

// Serve with warmed corn tortillas to scoop up all of the bean-y goodness.

Next time I'm back here, I'll share the news we've been siting on!


Get updates via // BLOGLOVIN' > FEEDLY > FACEBOOK > TWITTER

10.29.2013

Warm Soup >> For Cold Days

Top three reasons why soup is awesome:

> It is a vehicle for the wonder of all wonders - a loaf of good, crusty bread.
> You can hide endless amounts of vegetables in it and be none the wiser.
> LEFTOVERS!

I love soup all-the-year-round, but when it gets colder and drearier, I definitely ramp up both production and consumption. This Fall and Winter, I'm going to try and make a big pot of soup once a week-ish. It's just such an easy way to warm up and enjoy a big bowl of comfort during the darker days we have coming. I'll share the good ones here with you all. :) First up: this delicata squash and pear version. 
I made this a few times last winter, and when a couple of delicata squash came in our last CSA box, I remembered this recipe from last year. I think I had gotten some delicata squash last year about this time, and I just googled recipes and came across this one. I am not a huge lover of squash in its plain form, but I LOVE it in soups. The best part about this recipe is that it's super simple - two cups of each of the main ingredients.
Here's how you do it >

Delicata Squash and Pear Soup (from Saveur)

2 tbsp. olive oil
2 cups delicata squash (about 1lb, or 1 medium sized squash. Peeled, seeded, and diced)
2 cups shallots (about 4 medium, peeled and sliced)
2 cups pears (about 1lb; I used 3. Cored and diced. Pick firm ones.)
1/2 tsp. dried thyme
4 cups veggie or chicken stock
1 tbsp. balsamic vinegar
crème fraîche (I subbed sour cream)
maple syrup (you know, the real kind)
s+p to taste

Heat oil in a large pot over medium heat. Add the shallots, cook 4-5 minutes until softened. Add the squash and pears and cook until they start to soften, about 7 minutes. Add the thyme and let cook another minute or so for the thyme to get fragrant. Then, add the stock and vinegar. Let simmer until everything is nice and soft, 15-20 minutes. Puree with an immersion blender, taste, and add salt and pepper to your liking. DONE!

To serve: drizzle a spoonful of crème fraîche and a bit of maple syrup on each. It will look fancy and will impress people for no good reason, but also tastes good, so win-win.

TIPS >
// This does not make a huge pot of soup, probably about 4 good sized bowls.
// Have everything chopped and ready to go before you even start heating the oil. I am terrible at taking this advice, and think I am a faster chopper than I am and always inevitably almost burn things. Don't be like me.
// If like me you cannot find crème fraîche at your grocery store (really Safeway? This is 'MERICA!), do not fret, you can sub in sour cream. It will not swirl as prettily (compare my photo to Saveur's), but it will still taste pretty good. A bit of heavy cream or greek yogurt would work, too.

In related news, does this photo gross you out? You're not alone.
Happy eating!

shanti >> sondra

Get updates via // BLOGLOVIN' > FEEDLY > FACEBOOK > TWITTER

8.20.2013

How Sweet it Is >> Blueberry Crush


Remember how I went blueberry picking the other week? Well, knowing that the next What She Ate prompt was this week  is "how sweet it is," I figured I should not let the opportunity go by to combine the two. Problem was, I was not in the mood for baking (I rarely am). I actually made a blueberry vinaigrette for a quinoa salad that I was going to share here, but while it wasn't bad, it wasn't really "YOUGOTTAMAKETHIS" worthy either. Instead, I went with one of my old standbys: a delicious drink. 
I have a confession to make: I don't really like water. Not plain anyway. I mean, it's alright since it keeps me alive and all, but I'm not one of those people with a water bottle constantly attached to my hand. Mostly I drink tea and sparkling water when the urge hits, but I'm always on the lookout for ways to make water more appealing. Here, I went with muddled fruit.

1/4 c. blueberries
4-5 mint leaves
1 tsp. sugar
squeeze of lemon

Add these to the bottom of a glass, and using a muddler if you have one (you fancy bar mistress you), or a wooden spoon if you don't (I'm in this category), mash and mix well. When you're satisfied with your mash-abilities, top with sparkling water.
Are you thinking what I'm thinking? Why, yes, this WOULD be delicious with a bit of vodka thrown in! But it's plenty good as is, especially if it's before noon like it is for me. :)

Now go, fancy up your water!

shanti >> sondra

Get updates via // BLOGLOVIN' > FEEDLY > FACEBOOK > TWITTER

8.06.2013

Herb Marinated Tofu + Green Bean and Tomato Salad

As much as I've been enjoying The August Break, it was nice to put together a good recipe to share with you all today...and it was even nicer to eat it. Andy said he wished every night was "blog dinner" night...I can't decide whether to be pleased or offended by that comment. ;)

The challenge for this edition of What She Ate was "from the grill." Apropo for summer, right? Welllllll....since I'm not too big on meat, and I live in an apartment in the city and do not have a grill, I had to think a bit. At first I thought I'd try grilling fruit, but that's not such a novel idea anymore, and then I settled on the idea of trying my hand at a vegetarian classic: tofu. Since I don't have an outdoor grill, I used the next best thing, a grill pan.

Tofu gets a bad rap. Yes, it can be bland and rubbery, but so can a plain chicken breast if you don't cook it right or season it. Also like chicken, it has the advantage of taking on whatever flavor you want it to, and it can be adapted for pretty much any cuisine . This is less of a recipe and more of a technique for cooking excellent tofu.

First, you HAVE to press the water out of it. Start with extra-firm tofu, slice it into 1cm or so slabs, and lay out a stack of paper towels or a clean kitchen towel. Lay the slabs out, put some more towels on top, and then place something flat on top, like a cutting board or cookie sheet. Then, add weight. I used my cast iron dutch oven which worked marvelously, but some canned goods or even some books would be good, too. Then, wait 20-30 minutes. When you come back, you'll have compressed tofu slabs, all ready to replace the water you extruded with delicious flavors. So, now for the delicious flavors!

You can use any kind of marinade that you would normally see on meat, but basically some kind of vinaigrette variation. Here, I went with fresh herbs from my front step. I don't think the proportions of the herbs matter too much, since most of it won't stick to the tofu in the end anyway. Just use what you like or what you have! But, for reference, here's what I used:

HERB TOFU MARINADE

2 tbsp. lemon juice
3 tbsp. olive oil
3 cloves of garlic, minced
1 tbsp. finely chopped basil
1 tbsp. finely chopped rosemary
1 tsp. finely chopped tarragon
1 tsp. thyme leaves
S+P

Whisk together, and coat the tofu in a shallow dish or ziploc bag and put in the refrigerator. Then....wait. If you were smart, you'd do this in the morning or even the night before and REALLY let it marinate. But, if you're like me, you didn't think that far in advance, and an hour is the best you can do. No worries, it still turns out tasty! When you're ready to grill, get the pan going over medium high heat, and make sure it's good and hot before you start. While it's heating, get out some corn starch, and pour some into a shallow dish. I dredged these, but I thought it went on a little unevenly. Next time, I think I'd try sprinkling with a sieve or something, like with powdered sugar for a light dusting. Either way, the corn starch will help get you the crisp crust you're after. Then, grill away! Get both sides nice and crisp, and eat immediately. NOM.

I used the marinating time to put together a quick summer salad with the gorgeous tri-color beans and orange grape tomatoes that came in our CSA box last week. This is the second time I've cooked with purple beans. Too bad they're so pretty raw, but lose that gorgeous color when you cook them! At least I caught their splendor in a photo.
GREEN BEAN + GRAPE TOMATO SALAD

1/3 c. olive oil
2 tbsp. balsamic vinegar
1/2 small sweet onion, sliced thinly (I used Walla Walla)
1 1/2 c. grape tomatoes, sliced in half
1 lb. green beans (or yellow, or purple...)

Whisk the olive oil and vinegar together, and then add the onion and tomatoes. The acid from the vinegar and tomatoes will take the edge off the onions, so do this first so it can sit for a few minutes while you prep the beans. Next, put a pot of salted water on to boil. While this heats up, snap the heads and tails of the beans off, and cut smaller if desired. When the water has come up to a boil, drop the beans in for 4-5 minutes, cook until crisp-tender. Drain and plunge them into a bowl of ice water to stop the cooking. When you're ready to serve, pour the tomato and onion mixture over the beans, and season with salt and pepper. I didn't have any, but I bet a big handful of feta crumbles over the top would be heavenly on this...next time!

All in all, this was a lovely summer meal, and we enjoyed it on a balmy Seattle night. Nothing tastes better than produce cooked at the exact peak of freshness, especially when you made it with your own two hands.

shanti >> sondra

Get updates via // BLOGLOVIN' > FEEDLY > FACEBOOK > TWITTER

6.25.2013

In Season >> Watermelon, Nectarine, + Feta Salad


Time for What She Ate! This week's challenge: "In Season."
Hands down, this is the best and easiest time of year to eat in season (for those of us in the Northern Hemisphere anyway). As opposed to my sometimes tepid feelings towards vegetables, I love fruit, and now is when all of the good fruit is ripe. I didn't even have to do much to put this recipe together, because most of the ingredients came from my CSA box this week before we went out of town, and the mint came from my very own plant that's going gangbusters outside of our front door.

This recipe is just a variation on one of my favorite combos - watermelon, feta, and mint, which sounds weird to the uninitiated, but is really a subtle play on the classic salty/sweet combo. I wanted to jazz it up a little further, and also use up a little more of the abundance of produce we have. Here's what I came up with >>

WATERMELON, NECTARINE, + FETA SALAD & GINGER LIME VINAIGRETTE
(one main serving or two sides)

THE SALAD //
3 c. cubed watermelon
2 nectarines, pitted and diced
3 tbsp. chopped red onion
1/4 c. crumbled feta
2 tbsp. minced fresh mint

THE VINAIGRETTE //
1/2 tsp. minced fresh ginger
1/2 tsp. grated lime zest
1/8 tsp. dijon mustard
1 1/2 tsp. lime juice
1 tsp. rice wine vinegar
1/8 c. E.V. olive oil

Combine the salad ingredients in one bowl, and in another bowl, combine all of the dressing ingredients except the olive oil. Whisk the dressing ingredients while slowly adding the olive oil, or add it a little at a time. After it's fully combined, drizzle over the salad and toss gently. Voila! Summer in a bowl.

TIPS

// Don't make this ahead of time, you kinda have to eat it straight away. All of the juicy fruit combined with the salty cheese starts to make a liquidy pool in the bottom if you wait too long (although it will still taste delicious, it just won't be as pretty).

I know I've said this about every recipe I've posted, but this is SO GOOD. I suppose I only post the things that are delicious and save you from the duds (and believe me, there are duds) so that makes sense. I've inherited the "new recipe gene" from my grandma, whereby I just constantly make new recipes and have very few in my rotation. I guess I just love the adventure of seeing how something will turn out! Anyway, this one turned out great, so give it a go and let me know if you like it as much as I do.
Checkout  Stacy at Let it Unravel and Kate at Miner Temptations to see what they've come up with! On July 9th the challenge is "By the Campfire," which is beyond perfect, because I'll be in the midst of our three week camping trip by then. I'll be sharing something from the road! If you'd like to cook along with us, let any one of us know and we'll get you looped in. Also, you don't need to commit to doing all of them, it's cool if you just want to pop in for a post or two. ;)

I hope you're enjoying nature's bounty this summer!

shanti >> sondra

Get updates via // BLOGLOVIN' > FEEDLY > FACEBOOK > TWITTER

6.11.2013

No Ants at This Picnic >> Dilled Potato Salad

Cooking time again! Or, more importantly, eating time! I definitely don't like to cook so much as I like to eat. For the most part, I'm happy eating most meals out, especially now that the whole local-organic-farm to table-thing is a thing. So many tasty and healthy options at restaurants these days! But, alas, not only can I not afford that, I suppose it's good for me to actually rub two sticks together and see what happens. Today I rubbed some potatoes together and this is what happened.
This week's What She Ate challenge is "no ants at this picnic." I suppose potato salad isn't the most original idea in the world, but, it's a classic for a reason, amirite? BUT, this ain't your momma's potato salad. Or maybe it is, I probably don't know your mom. Well, it's not my momma's potato salad, although she did make a good one. At any rate, it's definitely MY potato salad, and last I checked, I haven't pushed any tiny people out of my body yet, so it's definitely not a potato salad from a momma. You still tracking here? Okay, here's how you make it.

DILLED POTATO SALAD {makes enough for a potluck-sized batch}

5 c. potatoes, diced into bite-size pieces
1/2 c. chopped green onion tops
1/3 c. finely minced fresh dill
1/3 c. mayo
1/3 c. plain yogurt
2 hard boiled eggs, chopped
1 tbsp. dijon mustard
1 tsp. garlic powder
1 tsp. sugar
S + P to taste

Boil the potatoes in salted water until fork-tender. Drain and let cool slightly. Add the rest of the stuff, and gently mix. NOW EAT IT! Or refrigerate it until you're ready to eat it, that's cool, too.

This is an improvement on the way I usually make this, as I added and subbed a couple of different things from normal. But let me tell you, this version is the new normal. SO. GOOD. Fresh dill is the star here; it makes it taste light and summery, not all heavy and mayo-laden like like the version you're maybe familiar with.

TIPS

// Start your potatoes in cold water, and salt the water. I learned this from Rachael Ray and it seems to be smart (here's why).

// Choose thin skinned potatoes, such as yukon golds or new potatoes. The skin is good for you, and contains lots of vitamins and fiber, plus you can be lazy and not peel them.

// You could totally go all yogurt and no mayo on this one. It's flavorful enough to still be delicious without the richness of mayo. I probably would have, but didn't think of it until I had added the first 1/3 c. of mayo in.

It's raining here today (What? In Seattle? Shut. Up.), so no picnics over here. However, I'm going to a yoga workshop-type-thing with a potluck afterwards, and this baby is coming with me.
For more good picnic eats, be sure to check out the other participants in this series, Stacy at Let it Unravel and Kate at Miner Temptations. In two weeks the challenge is "In Season," which at this time of year, isn't too hard of a challenge at all! If you'd like to join us, let any of us know!

shanti >> sondra

Get updates via // BLOGLOVIN' > FACEBOOK > TWITTER

5.28.2013

Spice it Up >> Cucumber Salsa

Most of the time, being one of those cooks who isn't big on measuring or following recipes too closely ("a pinch here, a handful there") works out great. I feel like I typically end up with tasty food, and I have a good intuition about what works and what doesn't. But every once in awhile, it comes back to bite you. This recipe was one of those times. Although, don't mistake me here -- because it was still REALLY good, and I am for sure going to make it again...but with one crucial adjustment.
So this, my friends, is cucumber salsa. Creamy, crisp, fresh tasting, and SPICY. ERMAHGOODNESSSPIIIIIICY! That's where the mistake came in...but it worked well with the challenge for this week -- "spice it up." Spice it up I did! I got too brazen with the jalapeño addition and that was where it went wrong. Usually the jalapeños I get are not very hot, and being a lover of spicy food, I can barely taste them. So I went ahead and threw the whole thing in, seeds and all. The little voice in my head said, "Wait! You can always add more, but you can't take it out! Start with half!" But then the other voice, was all, "Quiet, you! Just do it!"  Long story not any shorter, I highly recommend you make this, but go easy on the pepper, k?

CUCUMBER SALSA >>

1 large cucumber, peeled, seeded, and chopped
2 roma tomatoes, seeded and chopped
1 jalapeño pepper, SEEDED and chopped :)
1/4 c. chopped red onion
2 cloves minced garlic
4 tbsp chopped cilantro
2 tbsp chopped parsley
1/4 c. sour cream
1/2 tsp. cumin
1/4 tsp. seasoned salt
1 1/2 tsp. lime juice
1 1/2 tsp. lemon juice

Mix the first seven ingredients in one bowl, mix the last 5 in another bowl, then combine. Serve with tortilla chips. 

NOTES >>
// To make a vegan version, try a sour cream substitute like Tofutti's or make your own. Also, mine is a little creamier looking than yours will likely be, because I added extra sour cream to combat the heat. :)

// Reduced fat or fat free sour cream would work fine here, too, of course. If you're looking to lighten it up even further, you could even go down to just a couple of tablespoons without sacrificing too much flavor.

// You could easily skip the parsley, and add more cilantro instead. 

// This will be an awesome recipe when all of those cucumbers and tomatoes are piling up in the garden and markets later this summer! Recipe adapted from here.

This, of course, is this week's entry for the What She Ate linkup! Be sure to check out Kate at Miner Temptations  and Stacy at Let It Unravel to see what kinds of healthy, spicy creations they've come up with this week. And if you'd like to join us, in two weeks we'll be tackling outdoor eats with "No Ants at this Picnic." Send any one of us an email or comment if you'd like to cook along with us!

shanti >> sondra


Get updates via // BLOGLOVIN' > FACEBOOK > TWITTER

5.14.2013

Naughty, but Nice >> Cauliflower Crust


Sorry it's been so quiet around here this last week! It's not for a lack of inspiration, in fact, quite the opposite.  It's more a lack of time and energy. I've been working some extra hours the last couple of weeks, plus a lot of my internet time has been consumed by stalking Craigslist for places to live. No luck so far. Sigh.

However, a girl still needs to eat, right? Enter this week's entry to the What She Ate link up! This week's challenge: naughty, but nice. I pinned a recipe for a cauliflower crust pizza not long ago, and was intrigued by the premise. I'm a sucker for anything that sneaks veggies in where you least expect them (note my smoothie obsession). Plus I LOVE LOVE LOVE pizza; I'd eat it nearly everyday if I could. Oh wait, I can, and sometimes I do. :)

I ended up reading through a couple of different recipes and the comments from people who tried them, and came up with my own version. And this is not just hyperbole -- it was SO GOOD. Definitely a keeper. My husband, who hates cauliflower and made a face when I brought it home, also loved it. He declared, "best cauliflower ever," and then questioned if there was actually even cauliflower in it.

Here's what I did >

1 c. grated raw cauliflower (about two c. florets)
1 egg
1 c. grated mozzarella cheese
2 tsp Italian seasoning blend (oregano, basil, parsley)
1 clove of garlic, minced
pinch of salt

Preheat the oven to 450F. If you have a pizza or baking stone, this is a great time to bust it out. If not, no worries, a baking sheet will do, too. Leave it in the oven to heat up while the oven heats.

I used a food processor (well, sorta, the thing I make smoothies with) to mince the cauliflower finely, and then I laid a stack of paper towels in a colander and let the cauliflower drain for awhile. I pressed it with my fingers to get as much of the water out as possible. Alternatively, you could mix in the pinch of salt here and then let it sit for awhile to drain. The salt will help draw the moisture out. This step will help in getting a crisper crust, but is not totally necessary. Then mix the cauliflower with all the remaining ingredients, and mound onto a sheet of parchment.

Press the mixture out into a 12" circle as evenly as possible. The mixture won't exactly hold together right now, so just mash it and keep it formed. When you're happy with your circle, open the oven, pull out the rack with the pre-heated stone or pan, and carefully lift and set the parchment paper with crust on it. Bake for 10-15 minutes, keeping a careful eye on it towards the end.

Alright, donezos! From here, do what you will with it. You can top it with sauce and your favorite toppings, and stick it under the broiler for a couple of minutes. You could make it into breadsticks. Make a flatbread. Here, we went with no sauce, and just the classics: a little more shredded mozz, sliced tomato, and fresh basil. NOM NOM NOM.

Not exactly guilt-free pizza, but pretty close. Gluten free if that's your thing, vegetarian (maybe a vegan version with a couple of subs is possible?), and sneaks in extra veggies. Definitely naughty but nice in my book!

Want to cook (and eat!) along with us in two weeks? Let me know and I'll get you set up with the goods.

shanti >> sondra

Get updates via: RSS > BLOGLOVIN' > FACEBOOK 


5.06.2013

What She Ate >> Indian Slaw

Hey yo! I'm super excited to bring a new feature to this here ole blogspace, and that's with the introduction to a fabulous new link up I'm participating in! This is a new series started by Stacy at Let it Unravel, and it's meant to inspire and encourage all of us to eat delicious and taste-tacular food, in a thoughtful and healthful way. Awesome, right? Every couple of weeks, we'll tackle a new theme and share what we came up with. I don't know about you, but I definitely need inspiration in this department. While I enjoy cooking (and even more so, eating), I often find myself relying on the same rotation of meals. I love that not only will I get to challenge myself to come up with something great to share, but I also get to be inspired by what everyone else came up with. Win win!

To kick off, I thought I'd share an Indian dish that I made for lunch today: Indian Coleslaw. Say whaaaa?
Yup, like the good ole American coleslaw you know and love (or loathe), except not at all. This dish actually reminds me of the type of food that we'd eat at Satsanga for lunch: light, crunchy, and full of flavor. Here's how to do it >

Indian Slaw
1 bag shredded cabbage mix
1-2 serrano chiles, chopped (incl. seeds + ribs)
1/4 c. roasted + unsalted peanuts
1/4 c. shredded + unsweetened coconut
2 tbsp. canola or sunflower oil
1 tsp. black or yellow mustard seeds
1/4 tsp. ground tumeric
Juice of 1 lime
1/4 c. chopped cilantro
plain yogurt (optional)

Add the oil to a small saute pan and heat over med-high heat until the oil begins to shimmer. While this is heating, dump the peanuts into a food processor/spice grinder/coffee grinder type thing, and pulse until the peanuts have the consistency of breadcrumbs (don't go too far or you'll get peanut butter!). By now, your oil should be hot. Add the mustard seeds, and stand back, because they'll pop and sputter a bit, like popcorn. Let them go for about 30 seconds until they smell nutty, and remove from heat. Add the tumeric to the hot oil. This will extract the flavor and good spice-oils.

Now, add the peanuts and all of the rest of the ingredients to the cabbage in a large bowl, and drizzle the spice and oil mixture over the top. Toss well, and enjoy! I topped mine with a dollop of plain yogurt, since I feel all Indian food is best eaten this way, but you do what you feel. Also, a note about the serrano chiles. Wash your hands really well after chopping. Like, Really. Well. I washed mine, but an hour or so later I absently touched my eye which resulted in a burning tearfest of pain. Consider yourself warned. ;)
This recipe is from a recent episode of The Splendid Table (public radio nerd alert!), and I also made the other two recipes that were featured (Scented Rice Pilaf and Yellow Lentil Dal) which were SO SO SO good! I highly recommend them, especially if you're newer to Indian cooking like me.

Wanna join in on the culinary fun? Leave a comment here, send me an email, or get in touch with Stacy. Our first official post will be May 14th, with the challenge "naughty but nice." NOM!

shanti >> sondra

p.s. There's also a pinterest board for this group! Find us there.

Get updates via: RSS > BLOGLOVIN' > FACEBOOK 


4.24.2013

Oh, No >> Not Another Green Smoothie

Oh, yes, my friends, it IS another green smoothie; just what the world needed! I can't help it, I LOVE SMOOTHIES! I'll shout it from the rooftops if I have to. I know, I know, the interwebz are already flooded with smoothie recipes, and lordy knows I've done my share to contribute. But, you see, I've been on a bit of a health kick lately. I attribute it to equal parts spring fever, turning 30, one too many nights of one too many indulgences, and a desire to get in shape for our upcoming summer hikes.

Usually, I drink one smoothie a day, and I have an old standby that I always make (baby kale, banana, cucumber, pear). However, I have been wanting to mix it up a bit and expand to two, and I came up with this yesterday. It's an inspired by a recipe I got from a friend, but I added my own twists.
1 stalk celery
1 c. frozen pineapple and/or mango chunks
1 big handful of parsley
Coconut milk to taste/consistency you like

Blend it up and enjoy!

I toyed really hard with the idea of getting a juicer, but the more I thought about it, I decided that smoothies have got to be better for you since you're not filtering out all of the fiber and pulpy stuff. Instead, I got a new blender thingy (a Bella Rocket), and it's been working really well for me. I've been trying out new combinations that incorporate veggies, but still taste good. I mean, it's not hard to make a bunch of fruit mashed together taste great -- it's when you start throwing kale or broccoli into the mix that it gets interesting. Perhaps I'll share some more of my creations with you all...? Anyone else out there down with smoothies?

shanti >> sondra

Get updates via: RSS > BLOGLOVIN' > FACEBOOK 


4.13.2013

Easy Peazy, Lemon Squeezy >> Fizzy Basil Lemonade

I don't know about where you live, but it's been cold, rainy, and windy the last few days. What happened to spring?! Well, we're faking the funk over here, because today I made a batch of fresh lemonade.
I've never actually made fresh squeezed lemonade before. However, last weekend I was supposed to bring lemons for a cocktail I was collaborating on with a friend, and I totally left them sitting on the counter at home. Luckily I was able to run to the nearby store, but what to do with the bag of lemons sitting on my kitchen counter? I think we all know what to do when life hands us lemons, amirite?
So a-squeezing I went. When we lived in Berkeley, there was a cafe in our neighborhood that made the most wonderful basil ginger lemonade. I thought I'd try and recreate it, except in my mind all I remembered was the basil part. Next time I'll get some ginger up in here, too. Anyway, this version was most excellent as is. To make 6 twelve ounce servings (72oz total), you'll need:

3/4 c. lemon juice
1 1/4 c. basil simple syrup (directions below)
~1.5 liters (56 oz) sparkling water
basil for garnish (optional)
ice cubes

To make the simple syrup, bring 3/4 c. water + 3/4 c. sugar just to a boil, and take off of heat. Roughly chop 1/2 - 3/4 c. basil leaves, and add to sugar water. Using a spoon, muddle the basil leaves a bit to release some of the oils and flavor. Let cool. After this, you can choose whether or not to leave the basil pieces in; strain the syrup if you'd like them out.

When you're ready to serve, pour all of the ingredients into a pitcher over ice. Garnish with a lemon slice, or more basil if you'd like. This would also be fantastic with a bit of vodka thrown in, if you're feelin' sassy. ;)
There you have it! California dreamin, on such a winter's day I tell ya.

Let me know if you try your hand at this!

shanti >> sondra

Get updates via: RSS > BLOGLOVIN' > FACEBOOK


4.02.2013

Doggie Bag >> Pumpkin + Flax Treats

I don't know what got into me, but all of the sudden I thought it would be a good idea to make my own dog treats. I think it was because I saw a pin on Pinterest for treat recipes, and I didn't realize how easy it was to make your own. They're basically just weird flavored people cookies.

I am always scanning the ingredients list of the store-bought treats we get, and I only buy them if all of the ingredients are actually recognizable as food. The other thing I look for is price, and some of those fancy whole-food treats can get pretty expensive. Why? I have no idea. These were the cheapest thing ever to make. Don't have a dog? These would make awesome gifts for the dog lover in life!
Pumkin + Flax Dog Treats
(adapted from White on Rice Couple)
1 14.5oz can pureed pumpkin
1/4 c. brown sugar
3 eggs
1/3 c. olive oil
1/2 c. water
1/2 c. flax seeds
3 1/2 c. all-purpose flour
3 1/2 c. whole wheat flour

Preheat oven to 350. Mix ingredients in order listed, stirring thoroughly after each addition. When it came to adding the last few coups of flour, I mixed with my hands, which was easier. The dough should be pretty stiff and sticky. Roll out to 3/8" thickness (mine were definitely not that precise), and use LOTS of flour for this.

Then, cut out into whatever shapes you like! I wanted smallish treats, since our dog is a monster and wants many treats all. the. time. These are about 1 1/2" in diameter, and I used an empty honey jar to cut them out. Of course, you could get cutsey and find dog-themed cookie cutters to use as well. Piko isn't too into aesthetics; she said circles were fine with her.

Bake for about 30 minutes for smaller shapes like these; adjust the time based on the size/shape you choose.
The best part about making these was how many it made. I got well over 150 treats from this batch, plus Piko stole some of the rolled out dough while the first batch was baking. She was an ever-loyal watchdog throughout the process, staring at me in case I accidentally dropped anything on the floor. What a lady! I had all of the ingredients on hand, except for the pumpkin, so these were c-h-e-a-p to make. Win!

Let me know if you try making these!

shanti >> sondra

Get updates via: RSS > BLOGLOVIN' > FACEBOOK


2.11.2013

Heart Shaped >> Breakfast

I'm in the boat with most people, in that I think Valentine's Day is mostly overrated. Shouldn't you show your love in special and thoughtful ways every day? I'm also not a fan of chocolates, or red roses, or overpriced fancy dinners, or any of the other commercialization that goes along with the holiday.

That said, I do think it's nice to have a day that reminds us what this thing called life is all about: keeping our friendships and relationships strong, through acts of loving kindness. A really nice way to keep it low-pressure, is a special Valentine breakfast! I used a cookie cutter to make heart shaped eggs. If you had a couple of cookie cutters, you could also try your hand at making heart shaped pancakes. Oh, and by the way, acts of loving kindness are good for yourself, too. I made this breakfast for me, and it was delicious. :)

I paired my eggs with a tasty smoothie. I usually make green smoothies, but I wanted to come up with something that was a little more pink-hued.
I still wanted to sneak a vegetable in there, so I went with pumpkin. This made the smoothie more of a pinky-orange color, but it was still really pretty! More importantly, it tasted good.

To make >

1 c frozen strawberries
1 banana
1/2 c canned pumpkin
2/3 c vanilla almond milk

Blend up and enjoy!

We're off this afternoon and evening for a little Valentine get-away of our own. AKA an excuse to drive across the state for some of our favorite pizza. Yes, I am that dedicated.

shanti >> sondra


1.25.2013

The Secret Ingredient >> Is Love

Last weekend, Andy demanded cake. This is unusual. I am the one with the sweet tooth, not him. But when a man demands cake, you gotta give it to him, right? ;)
At any rate, it gave me a good excuse to try out this lemon + lavender cake that I had pinned on Pinterest. It was pretty simple to put together, but I didn't want to haul out the stand mixer, so I creamed the butter and sugar by hand. I dunno, I find something very gratifying about cooking the way my great grandmother might have. I mean, if I am going to all the trouble to bake from scratch, why not put a little extra sweat and love into it while I'm at it?

If you try this recipe and you really like lavender, I'd suggest doubling the amount of lavender. It was pretty subtle in mine, and I would have liked more. If you're not sure if you like the flavor of lavender, make it as is and see. It's a very unusual flavor, and not for everyone. Personally, I love it, and it has me itching to try out a few other lavender recipes that I've had up my sleeve.

shanti >> sondra

Get updates via: RSS * BLOGLOVIN' * FACEBOOK * TWITTER


11.26.2012

The Hummus >> Among Us

Today I am at home, decorating for Christmas a bit and jamming out to some Christmas tunes on Grooveshark. But before I start posting about Christmas stuff, I want to get the other recipe I made for Thanksgiving up.
I made delicata squash hummus, which was SUPER DELICIOUS and SUPER EASY. It was a big hit. I highly recommend this if you need to bring any potluck-type dishes this season. Beware though, it made a TON, so if you don't need a large amount, I would halve the recipe below.

Here's the recipe, from Delighted Momma >

- 2 cups of butternut squash (I used delicata, because it came in our farm box last week)
- 1/2 cup of tahini (sesame seed paste)
- 3 tablespoons of extra virgin olive oil.
- 2 cloves of garlic
- The juice from half of a lemon
- A dash of cumin
- 3 dashes of cinnamon
- 3-4 dashes of pepper

Slice up the butternut squash into small pieces and boil for about 8-9 minutes or until soft.
Throw all the ingredients into a food processor or blender and pulse until smooth and creamy.
Enjoy!

Andy made rosemary flat bread to go with it, which was perfect. Basically, make your favorite pizza crust dough (or even easier, buy one pre-made from the grocery store), roll out, and top with a little bit of minced garlic, olive oil, chopped rosemary, and a little salt. Bake until crispy and slice into little pieces. Easy peasy, homemade goodness! This whole thing, hummus + bread, came together in about half an hour.

Now, back to Christmas. I have been doing quite a bit of shopping online so far this year. Not as fun as going out to the stores, but definitely less stressful. Plus, I can browse handmade and artist shops on Etsy and the like, which is nice. Are you hitting any cyber Monday sales? Find any amazing shops I should know about? I am always looking for cool ideas!

shanti >> sondra

Get updates via: RSS * BLOGLOVIN' * FACEBOOK * TWITTER


11.23.2012

Like a >> Winter Pear

Holy man, did we feast yesterday! Our Thanksgiving was a smashing success, thanks to lots of hard work from our host. We had a slightly non-traditional Thanksgiving in that we had turkey pot pies instead of regular turkey, but they were AMAZING! So many delicious things. Lots of laughs, lots of wine, and lots of game playing was had.

I was put in charge of bringing a pre-dinner cocktail and an appetizer to snack on while we all waited for the main event. Both things ended up involving rosemary. This was perfect because not only is it seasonal and I love it, but we have a huge hedge of it out front.

Today I'll share the rosemary pear cocktails that I made. I had made one recipe that I found, but thought it was a little heavy, so I made some alterations and came up with these. They were SO GOOD.

For one cocktail >
In a shaker combine
> 2 tablespoons pear flavored vodka
> 1 tablespoon rosemary simple syrup
> 1/4 c. pear juice
> sprig of rosemary
> handful of ice

SHAKE SHAKE SHAKE
> pour over a glass of ice
> top with lemon sparkling water

ENJOY! Hopefully you like rosemary as much as I do, because I have some other ideas on how to use it that I am going to share here soon.
I have to work all day today, and in fact I work all weekend. If you are off, enjoy it for me, because I really wish I were staying home to clean, decorate for Christmas, and nest a bit.

shanti >> sondra

Get updates via: RSS * BLOGLOVIN' * FACEBOOK * TWITTER


10.09.2012

Soothe Your Throat >> Soothe Your Soul

Hi, guys. We were supposed to go to the mountains for a hike today, but instead we are taking our kitty in to the vet. She's prone to painful crystals forming in her bladder (TMI?) because sometimes she doesn't drink enough water, but usually we're able to catch it quickly and coerce her into drinking more. This time though, she doesn't seem to be getting better, so in we go. Her appointment isn't for a couple of hours, so I have a little extra time to work on blog stuff instead. Well, when life gives you lemons...you should whip this little recipe up...? ;)
When I came across this in my Facebook feed a few weeks back, I knew I had to make it. It sounded too simple, too smart, too obvious not to make it. I often suffer from frequent sore throats and dry, awful coughs in the winter, in particular following any type of cold or upper respiratory thing. The coughing gets so bad sometimes that it keeps me up at night. I have tried pretty much every cough syrup out there, including prescription ones, and I am here to tell you that they do not work. What does work? Honey! It really coats your throat and soothes that tickly feeling.

Here's how to make this simple elixir. You'll need:

> a glass container that seals
> enough lemons to fill it
> honey
> 1"-2" piece of ginger root

Slice. Fill. Done.
Refrigerate. After awhile, the lemons will sort of dissolve into a jelly-like substance, and you can just add a spoonful or two to hot water when you feel like you need a little self-care. In addition to the honey coating your throat, the lemons help to cut mucous, and the ginger works as a natural decongestant. The jar should last 2-3 months in the refrigerator. According to internet lore, this stuff is ubiquitous in Asia, and you can buy it pre-made in any grocery store there. But what fun is that?

While I certainly hope I don't get sick and need to use this, I'm glad I already have this mixed up and ready to go for when that inevitable first cold strikes. If only it worked for cat bladder problems!

shanti >> sondra

Get updates via: RSS * BLOGLOVIN' * FACEBOOK * TWITTER


10.03.2012

From Fading Light >> On Flying Wings

It's happened. I'm up to a four cups of tea a day minimum, I've been wearing scarves non-stop, and yes, I have baked with gourds. It seems like it changed from Fall-ish to F.A.L.L. almost overnight. Ahhhh, I love it when that happens. This is my first real Autumn since leaving Minnesota almost three years ago. Forgive me while I revel in it.

The change of the seasons is in my bones, in my cells, in the fibers of my being. I can't begin to describe how distressing it was to not be in tune with Nature's rhythms the last few years. While I was sloooowly adjusting to the beat of a new drum in California, I think it would have taken several more years to un-do the previous 25 years that my bio-clock was already synced to.

And now, some gratuitous photos of baked pumpkin goods.
This is a Pumpkin Pear Bread from this month's issue of Vegetarian Times. I loved the concept of the big chunks of pear in the bread, but I won't make this one again; I just wasn't a fan of the bread parts of this one. I think just adding pear to your favorite pumpkin bread would be delicious though.
These muffins, however, were quite good. Any muffin with a crumbly topping is a winner. I used raisins in them as the recipe called for, but dried cranberries would be super good, as well as maybe some chopped walnuts or shredded carrot.
Ahhhhh, isn't Yogi Tea the best?! Nothing like a little tea bag wisdom. Have you been cooking with gourds lately? Let me know if you have any killer recipes!

Embracing the season over here...
shanti >> sondra

Get updates via: RSS * BLOGLOVIN' * FACEBOOK * TWITTER


8.26.2012

Bánh mì >> In My Belly

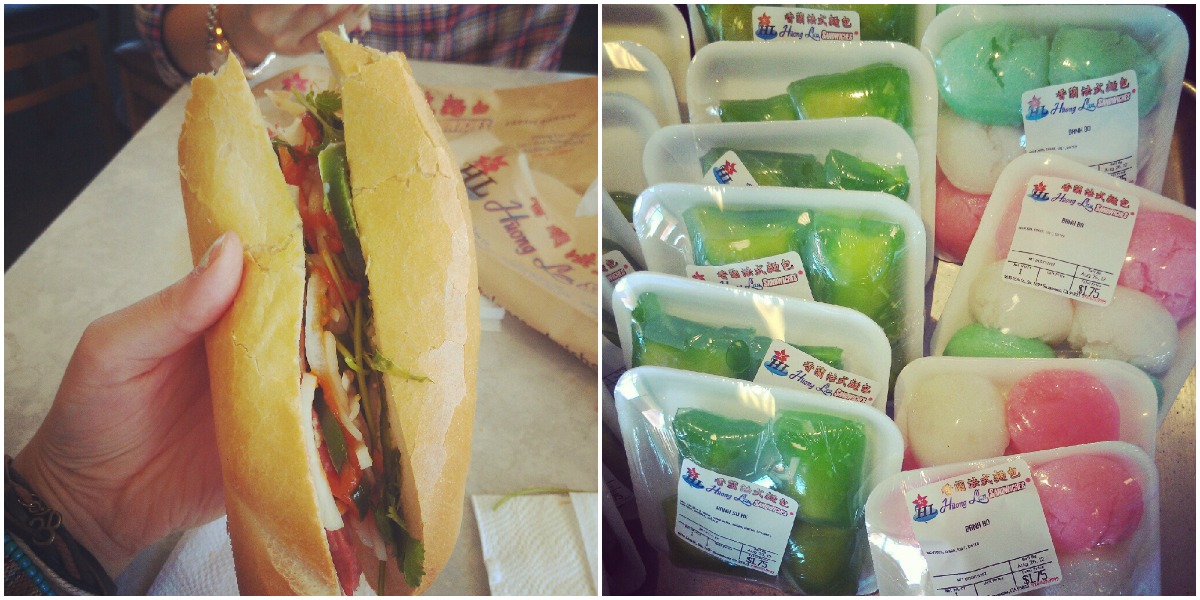
Today I thought I'd share a bit about one of my very favorite food items: the bánh mì. If you live somewhere with a population of Vietnamese immigrants, then you probably already know the magic that is the bánh mì (pronunciation guide >> bon me).

But in case you don't know, it's a Vietnamese sandwich that is a commonly sold street food in Vietnam, and increasingly, in the U.S. and abroad. The French occupied Vietnam from the late 19th century until 1945, and this sandwich is a result of the culinary marriage that transpired. It combines French bread, mayo, and pate (on the non-vegetarian versions) with traditional Vietnamese ingredients, such as cilantro, daikon, and jalapenos. The result is a really unique flavor combination that is fresh, light, and satisfying. Plus, they're super cheap, usually around $3.

My friend Dorothy took me to South Sacramento which has a large Vietnamese and Chinese community, and we enjoyed tasty bánh mìs last week. Since she's Vietnamese herself, she taught me a little about some of the other desserts and specialties that we saw, some of which are in the picture on the right. We ate the most wonderful banana things that you dip in sugar and coconut milk....mmmmmm.

I also tried my hand at making them myself, and I have to say, they turned out AWESOME. While it was more work and probably not cheaper than buying them out, making them at home was fun and I was able to buy organic versions of the ingredients. Plus, if you can't buy them locally where you live, this is a great alternative. They tasted EXACTLY like the ones we get at our favorite hole in the wall we go to in San Francisco. Here's a pic of what mine turned out like (ugh photographing food is the WORST):
And here is the recipe that I used from thekitchn.com. I didn't have a julienne-er thingy, so I just used a vegetable peeler to make thin shavings of the carrot and daikon which worked perfectly.

Thanks for letting me share about one of my favorite foods with you! I hope that if you have never tried one of these babies before, that you give 'em a shot.

Our house is a currently a disaster as we continue packing. I think we've made enough progress though to take a last day trip to Lake Tahoe tomorrow. I can't wait! A day off from the moving stress sounds pretty good right about now.

shanti >> sondra

Get updates via: RSS * BLOGLOVIN' * FACEBOOK * TWITTER